Today we are going to continue evolving our props, this time by introducing physical components.
Physical components allow us to create things like punching bags, springs, various pivot points as well as hanging our player from the ceiling in various sadistic ways. How fun !
In addition to that we are going to throw in some addition attack modifiers so we can easily switch between light, medium and strong attacks.
Today we are going to start introducing props for our character to interact with and I can’t think of anything better then creating a bunch of things to smash.
For this tutorial we will use the Apex Destruction plugin to generate some destructible meshes which we can then hookup to our destructible components.
This week we continue on with fundamentals, this time going over how to override UAnimInstance in order to have more control and tighter C++ integration with our other classes.
We looked at UAnimInstance before, have you gone senile !
Last time we looked at UAnimInstance was in the context of using it to access montage controls to give us finer control over our animation playback. This time we are going to move the Event Graph definition from a blue print driven anim instance and migrate all that functionality into our own C++ class.
Why bother rolling our own ? Blueprints are easy !
We can certainly use blueprints for all this work but having low level c++ access gives us a lot of control over our animation settings.
For example if you want to extend your animation system to support Inverse Kinematics, it becomes much simpler to compress that logic via convenient c++ method definitions rather than having to draw out a spaghetti bowl full of blue print nodes that make it hard to debug and troubleshoot.
Let’s take a look at some of the methods involved in this process.
As you can see from our code, there is really not much to it.
Outside of overriding the methods you want to take control of the rest comes down how much or how little animation data you want to expose to the blueprint.
The only real major point of complication is to ensure that the pawn attached to this animation instance is correctly cast before you get at it’s details.
With your own anim instance you can now start compartmentalizing your complicated logic, handle various player types against different blend space behaviors and generally modify your animation to suit your game.
Back to fundamentals with LineTraceSingleByChannel and a bunch of other little methods that go, oh so well, with line traces.
First thing’s first, what is LineTraceSingleByChannel ?
Trace a ray against the world using a specific channel and return the first blocking hit … straight out of the documentation.
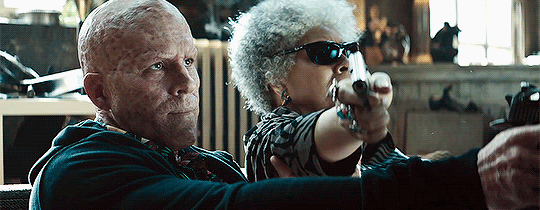
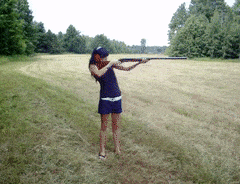
If that is not clear enough perhaps this picture can illustrate roughly what a line trace does. Let’s break it down:
So the line trace in our case is the stick
The start point of the line trace in the world is the bottom right hand corner where someone is holding it
The end or the destination of the line trace is Ned Flanders’s eye.
Cool.
Now what can we do with line traces ?
Turns out a bunch of stuff.
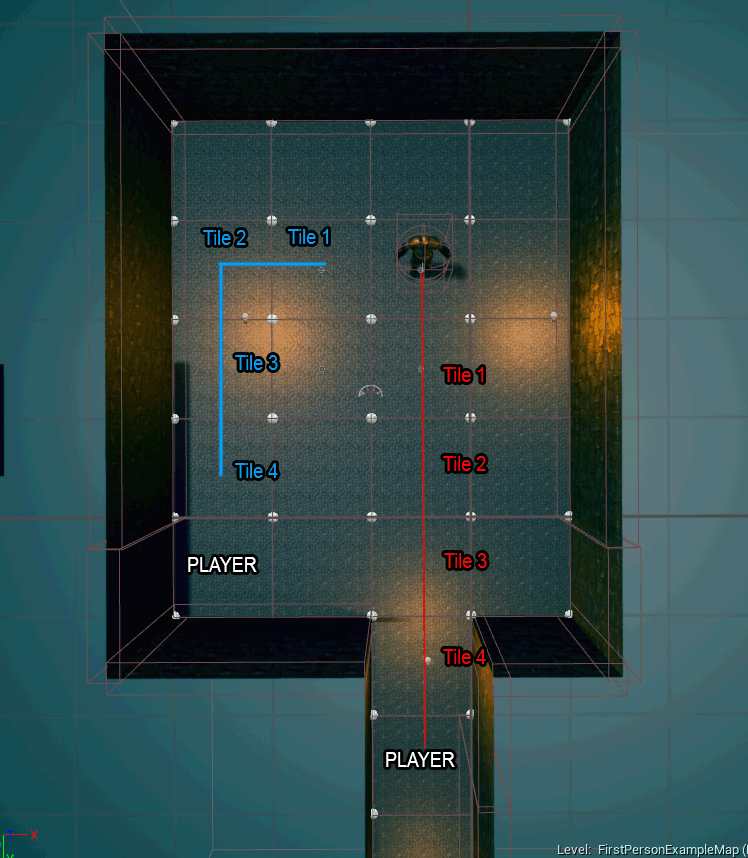
We can use them to determine where objects are in space relative to us.
For example, in the picture above, the game creator is sending a line trace from the GetRightVector and GetForwardVector location and based on the collision of those hits.
He can then determine the next move for the tile based character component.
He is also determining if the line trace is interacting with any static meshes and if that occurs he shoots out another line trace now parallel to the characters forward vector whatever the remainder of the length of the trace was.
So, all those games you enjoy playing, that are turn / tile based, can be very easily created using this technique !
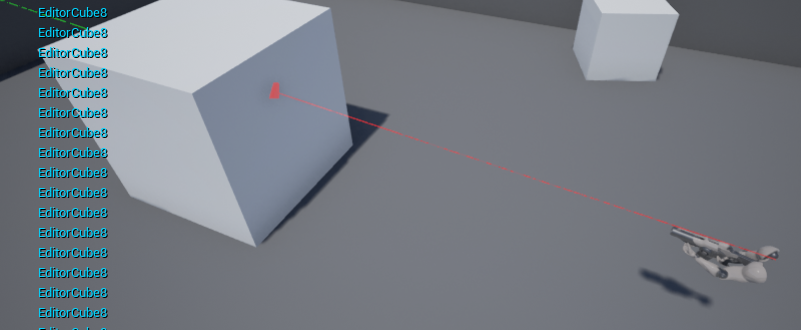
Let’s take a look at the other example.
Here we can shoot a line trace against a component in order to determine if it can be destroyed.
We are going to do something similar to this example but don’t let my lack of imagination stop you from trying other wacky possibilities.
Ok let’s get to drawing some line traces and stop screwing around
A basic line trace needs a few components, let’s take a look at the code below.
float LineTraceDistance = 100.f;
FVector Start;
FVector End;
// get the camera view
FVector CameraLoc = FollowCamera->GetComponentLocation();
FRotator CameraRot = FollowCamera->GetComponentRotation();
Start = CameraLoc;
End = CameraLoc + (CameraRot.Vector() * LineTraceDistance);
// additional trace parameters
FCollisionQueryParams TraceParams(FName(TEXT("InteractTrace")), true, NULL);
TraceParams.bTraceComplex = true;
TraceParams.bReturnPhysicalMaterial = true;
//Re-initialize hit info
FHitResult HitDetails = FHitResult(ForceInit);
bool bIsHit = GetWorld()->LineTraceSingleByChannel(
HitDetails, // FHitResult object that will be populated with hit info
Start, // starting position
End, // end position
ECC_GameTraceChannel3, // collision channel - 3rd custom one
TraceParams // additional trace settings
);
if(bIsHit)
{
// something was hit
}
else
{
// we missed
}
Breaking it down we can see that the major parts are the start and end locations of where we want the line trace to travel to and from. We obtain those details from the players camera so, wherever our mouse is looking we will shoot out a line up to 100 units.
We can also see that we are going to use the third custom collision channel we created so whatever those settings connect with will be hit.
In addition we are passing in a few line trace parameters, specifically the following:
bTraceComplex – which tells us to use complex collision on whatever we interact with to provide better precision.
bReturnPhysicalMaterial – which tells us to provide details about the physical material, if one exists on the thing we hit, to come back in our hit result.
Lastly we can see that the result of the hit interaction goes into the FHitResult struct from which we can examine various bits of information about what we hit.
You holdin’ FHitResult ?
There are various bits of data we can get back from each hit result so let’s take a look at a few basic ones
if (bIsHit)
{
Log(ELogLevel::WARNING, "We hit something");
Log(ELogLevel::WARNING, HitDetails.Actor->GetName());
Log(ELogLevel::DEBUG, FString::SanitizeFloat(HitDetails.Distance));
}
In this example we are simply printing out the name of the actor we hit as well as the distance between our point of origin and where the hit connected.
Based on those two details we already can do a bunch of stuff like cast the actor to the correct type and perform operations on him, like causing damage or displaying a menu or playing a sound.
Also based on the distance we can make certain assumptions, if the distance is greater than X perhaps our hit doesn’t generate damage or generates less damage due to distance. Or if the distance is too far we cannot interact with a certain lever in the game.
Lot’s of possibilities.
Great but I can’t see where I am aiming ?
No problem, we can drop in a few debug helpers to get us on our way. Specifically DrawDebugBox and DrawDebugLine which let us visualize in the world which way the line goes as well as where the hit occurs.
Here is the code snippet:
if (bIsHit)
{
Log(ELogLevel::WARNING, "We hit something");
// start to end, green, will lines always stay on, depth priority, thickness of line
DrawDebugLine(GetWorld(), Start, End, FColor::Green, false, 5.f, ECC_WorldStatic, 1.f);
Log(ELogLevel::WARNING, HitDetails.Actor->GetName());
Log(ELogLevel::DEBUG, FString::SanitizeFloat(HitDetails.Distance));
DrawDebugBox(GetWorld(), HitDetails.ImpactPoint, FVector(2.f, 2.f, 2.f), FColor::Blue, false, 5.f, ECC_WorldStatic, 1.f);
}
else
{
Log(ELogLevel::WARNING, "Nothing was hit");
// start to end, purple, will lines always stay on, depth priority, thickness of line
DrawDebugLine(GetWorld(), Start, End, FColor::Purple, false, 5.f, ECC_WorldStatic, 1.f);
}
You can see that when we hit something we draw a green debug line and a debug box at the point of impact.
While when we miss we just draw a purple line all the way to the extend of our line trace.
Not bad, but make something interesting !
Ok fine, calm down ! We will make a shotgun spread using Math..s !
For this we are going to dive into the FMath library specifically VRandCone
// convert the degrees to radians
const float Spread = FMath::DegreesToRadians(LineTraceSpread * 0.5f);
FVector Start;
FVector End;
// convert the degrees to radians
const float Spread = FMath::DegreesToRadians(LineTraceSpread * 0.5f);
// get the camera view
FVector CameraLoc = FollowCamera->GetComponentLocation();
FRotator CameraRot = FollowCamera->GetComponentRotation();
Start = CameraLoc;
// handle spread
End = CameraLoc + FMath::VRandCone(CameraRot.Vector(), Spread, Spread) * LineTraceDistance;
Now with a bit of imagination we can take this bit of logic and turn it into a dangerous weapon, for example:
We build a weapon object of type shotgun
That object contains one to many shells in it’s magazine
When each shell is fired we generate 6 pellets
We then take our logic and loop over it 6 times using the direction of the weapon as our starting line traces and the weapons range as the end.
Boom !
Not something we will look at today but in the near future, I promise !