<style>.lazy{display:none}</style> Skip to main content

Unreal Engine C++ Fundamentals – UAnimNotify & UAnimNotifyState

By Development, Tutorial, Unreal 3 Comments

Hey guys,

Today we are going to continue exploring Unreal Engine C++ Fundamentals before we get back to our Player Character series by taking a look at Anim Notify and Anim Notify States.

You can find the GitHub project for this video in the usual location.

What is a Anim Notify ?

An Anim Notification or a UAnimNotifyis a way of assigning events to parts of our animation that will be triggered at specific times of the animation playback.
UAnimNotifiesreally only have one notification event. It either fires or it doesn’t.


Why do I care ?

Well most games have various animations and each animation may trigger different effects depending on it’s life cycle.
For example if we want to play back a noise that a weapon makes as our character slices it through the air we may want to use an UAnimNotifyto trigger this event and then we can tie that event to the playback of our wooooshing sound.
We can also use notification events to trigger special effects, events in the game, UI updates, whatever you can imagine you can tie into this execution.

Ok smart guy what about Anim Notify States ?

Anim Notify States or UAnimNotifyStateare almost identical to our Anim Notifies except for one difference and that is that Anim Notify States come with three events:

  • NotifyBegin
    • This even is fired once when the notification is first triggered.
  • NotifyTick
    • This event fires continuously every tick, during the execution of an UAnimNotifyState.
  • NotifyEnd
    • This even fires once at the end of the UAnimNotifyStateexecution.


Alright so we have these magical events, how do we code them ?

First let’s take a look at a UAnimNotify

// HEADER

UCLASS()
class UE4FUNDAMENTALS03_API UPunchThrowAnimNotify : public UAnimNotify
{
  GENERATED_BODY()

public:
  virtual void Notify(USkeletalMeshComponent* MeshComp, UAnimSequenceBase* Animation) override;

};


// SOURCE CPP

void UPunchThrowAnimNotify::Notify(USkeletalMeshComponent* MeshComp, UAnimSequenceBase* Animation)
{
    // print method name to screen
    GEngine->AddOnScreenDebugMessage(-1, 4.5f, FColor::Purple, __FUNCTION__);
}

So, as you can see, by inheriting from UAnimNotifywe are able to overwrite the “Notify” method and then print some stuff to the screen.
Pretty easy.

Now let’s see what a UAnimNotifyStatelooks like

// HEADER H

UCLASS()
class UE4FUNDAMENTALS03_API UPunchThrowAnimNotifyState : public UAnimNotifyState
{
  GENERATED_BODY()

public:
  virtual void NotifyBegin(USkeletalMeshComponent* MeshComp, UAnimSequenceBase* Animation, float TotalDuration) override;
  virtual void NotifyTick(USkeletalMeshComponent* MeshComp, UAnimSequenceBase* Animation, float FrameDeltaTime) override;
  virtual void NotifyEnd(USkeletalMeshComponent* MeshComp, UAnimSequenceBase* Animation) override;
  
};


// SOURCE CPP

void UPunchThrowAnimNotifyState::NotifyBegin(USkeletalMeshComponent* MeshComp, UAnimSequenceBase* Animation, float TotalDuration)
{
    GEngine->AddOnScreenDebugMessage(-1, 4.5f, FColor::Yellow, __FUNCTION__);
}

void UPunchThrowAnimNotifyState::NotifyTick(USkeletalMeshComponent* MeshComp, UAnimSequenceBase* Animation, float FrameDeltaTime)
{
    GEngine->AddOnScreenDebugMessage(-1, 4.5f, FColor::Yellow, __FUNCTION__);
}

void UPunchThrowAnimNotifyState::NotifyEnd(USkeletalMeshComponent* MeshComp, UAnimSequenceBase* Animation)
{
    GEngine->AddOnScreenDebugMessage(-1, 4.5f, FColor::Yellow, __FUNCTION__);
}

Cool ! Now show me how to tie those events into my game.

Well the majority of that is covered in the video but if you are curious this is what the events look like when you add them to the animations.

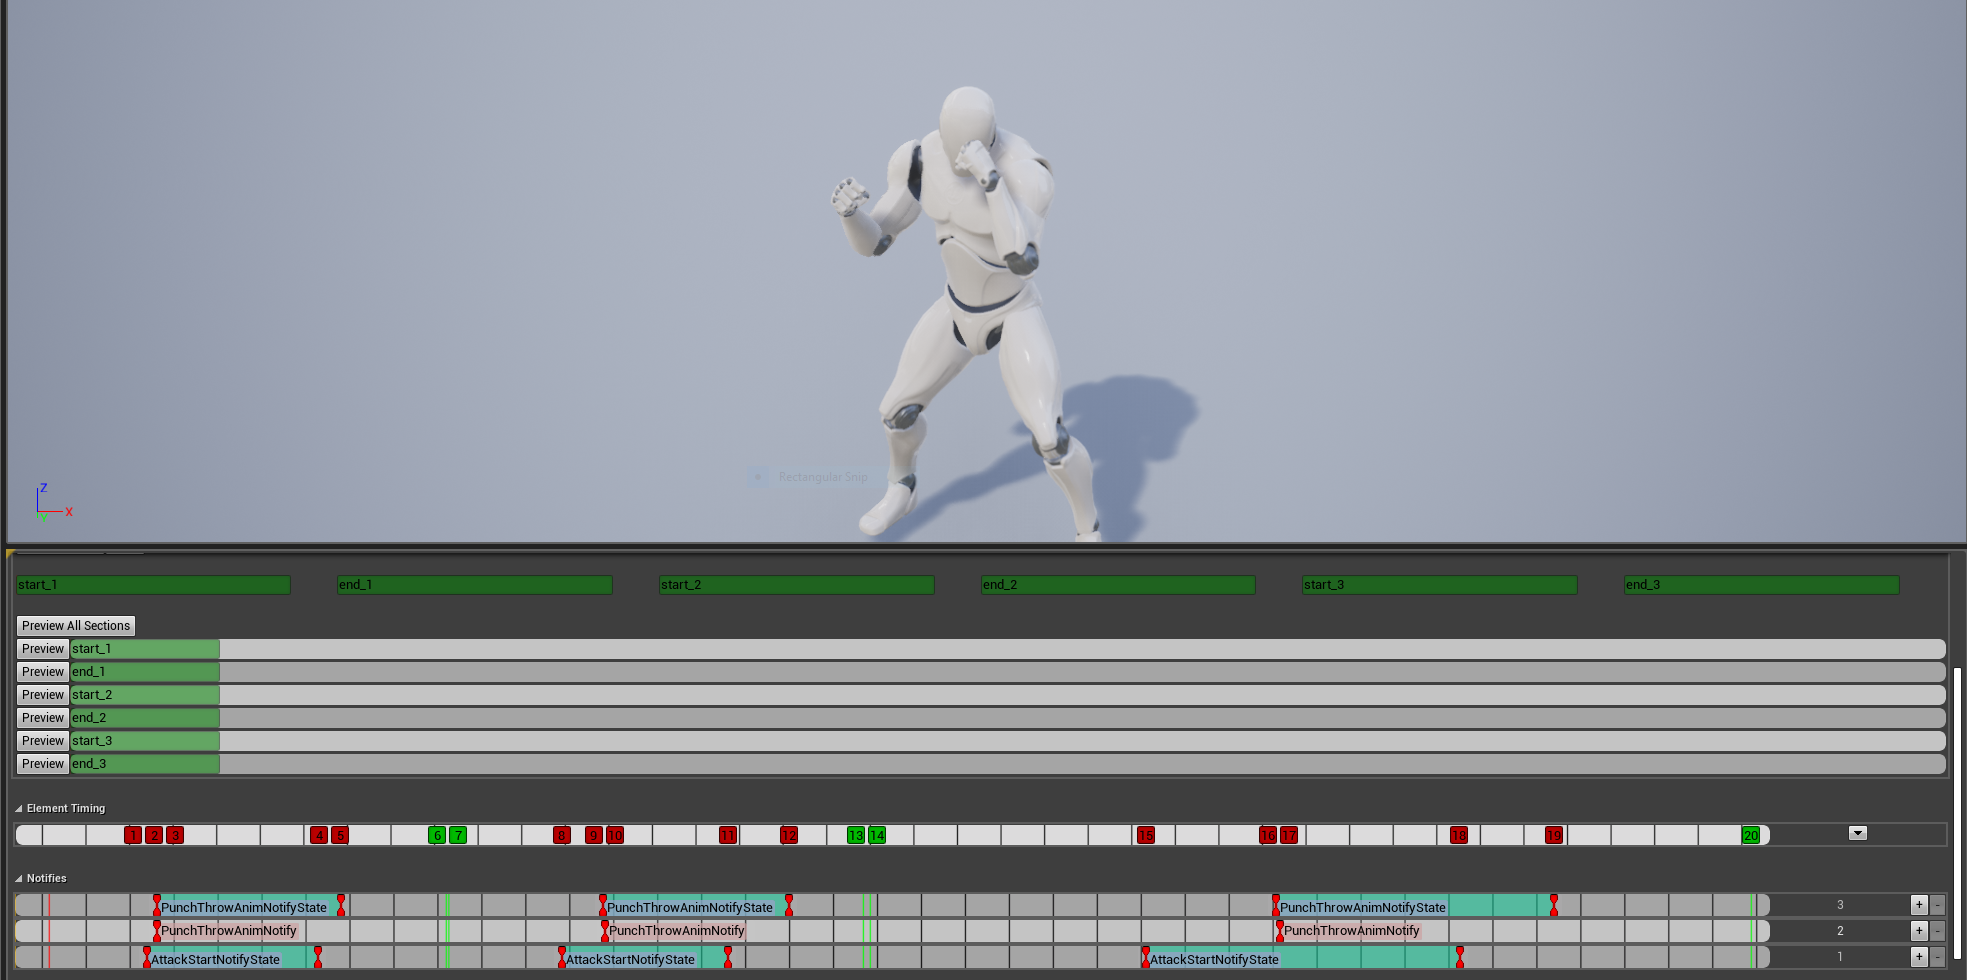
The way we added these notifications was by going to the bottom part of the animation montage labeled “Notifications”.
Then by Right Clicking we were able to pick our notifications.

This was all done from the Melee animation montage.


POINT OF NOTE:

UAnimNotifyand UAnimNotifyStatescan be added to single animations as well as animation montages. Which gives you a lot of freedom as to where and how you want these events to be triggered.


So there we go guys, with just a few lines of code and a bit of clicking we have notifications coming out of our animations and into our game.
If you would like to learn a little bit more about these various topics, check out the following links:

Unreal Engine C++ Fundamentals – DataTables

By Development, Tutorial, Unreal 2 Comments

Hey guys,

We are going to continue exploring Unreal Engine C++ Fundamentals by taking a look at data driven development using DataTables.

As usual I have created a GitHub project which I will be going over in the video.

What is a data table ?

A DataTable is a grouping of records that all share common properties which can then be accessed by row references or row keys.

Another way of putting it it’s a collection of rows, like in a spreadsheet, that all have shared columns.

And yet another way is to say it’s a simple key value store.

Or a database.

Enough with your damn words, show me pictures !

Let’s take a look at the example below.

We have two rows, that contain the following attributes / columns:

  • Montage – a reference to a previously made animation montage.
  • Total Animations – the amount of animations we are expecting to start during an attack.
  • Description – a quick blurb about what is it we are storing here.

Great we went from games to spreadsheets ? What gives ?

Well as much as we all want to do fun stuff when it comes to game development, at the end of the day it is just software development. Most software development jobs require you to use a database of some sort at least once. There is SQL Server and Postgres and MongoDB and even Excel. All those things end up powering applications and games alike, as we all need to retrieve and store large sets of common data.

In the game dev space it’s just used for a bit more fun than in the other sectors.

What all this allows us to do is have common spots to enter data that represents a lot of “stuff” in our game and then be able to query or retrieve that data on a whim.

Let’s look at the example below.

If you had an RPG that had static definitions around experience and how much of that experience you need to reach a specific level. You could do all this by hand and add it to your class definitions but then if you want to make changes you have to stop everything, recompile, retest and try again. It would be much easier to just have a listing of those values and tweak them as needed.

Now if you have a data table, a database, a container object that you can manipulate outside of your game that will allow you to adjust to values. All of a sudden you become a wizard, as changes to those data points become trivial. Update a file, save, and re run your game.

Ok I am sold, so how do I make one ?

DataTables are essentially USTRUCTSthat derive from FTableRowBase. The inheritance from FTableRowBaseis what allows them to be brought in as DataTable definitions into Unreal Engine, without that they are just plain old structs.

POINT OF NOTE:

To utilize DataTables you will need to ensure you are including the DataTables header in your code.

Like so: #include "Engine/DataTable.h"

Now let’s see what a DataTable looks like in action.

// Header
#include "Engine/DataTable.h"


USTRUCT(BlueprintType)
struct FPlayerAttackMontage : public FTableRowBase
{
  GENERATED_BODY()

public:
  /** montage **/
  UPROPERTY(EditAnywhere, BlueprintReadWrite)
    UAnimMontage* Montage;

  /** count of animations in montage **/
  UPROPERTY(EditAnywhere, BlueprintReadWrite)
    int32 AnimSectionCount;

  /** description **/
  UPROPERTY(EditAnywhere, BlueprintReadWrite)
    FString Description;
};

That was pretty simple, now what ?!

Well now you have a few options:

  • You can read data from the data table directly in C++, as well as write records.
  • You can import the data that goes into a data table from a CSV or JSON file to save you some time.
  • You can construct them on the fly and do whatever you need to do with them.

So let’s take a look at reading, as that will be the primary function.

// Header
UPROPERTY(EditDefaultsOnly, BlueprintReadOnly, Category = Animation, meta = (AllowPrivateAccess = "true"))
class UDataTable* PlayerAttackMontageData;


// Source - constructor
static ConstructorHelpers::FObjectFinder<UDataTable> PlayerAttackMontageObject(TEXT("DataTable'/Game/TUTORIAL_RESOURCES/DataTables/PlayerAttackMontage.PlayerAttackMontage'"));
if (PlayerAttackMontageObject.Succeeded())
{
  PlayerAttackMontageData = PlayerAttackMontageObject.Object;
}


// Source - calling data table
static const FString ContextString(TEXT("Player Attack Montage"));
FPlayerAttackMontage* AttackMontage = PlayerAttackMontageData->FindRow<FPlayerAttackMontage>(FName(TEXT("Punch1")), ContextString, true);
if (AttackMontage)
{
  // generate  number between 1 and whatever the data table contains for animation counts:
  int MontageSectionIndex = rand() % AttackMontage->AnimSectionCount + 1;

  FString MontageSection = "start_" + FString::FromInt(MontageSectionIndex);

  PlayAnimMontage(AttackMontage->Montage, 1.f, FName(*MontageSection));
}

Reading is easy, creation is hard !

In addition to reading we can also write to our data tables from within our game.

// define our data table struct
FPlayerAttackMontage NewAttackMontage;
NewAttackMontage.AnimSectionCount = 10;
NewAttackMontage.Montage = NULL;
NewAttackMontage.Description = "Newly added row";

// call AddRow to insert the record
PlayerAttackMontageData->AddRow(FName(TEXT("New Row")), NewAttackMontage);

Not bad, eh folks ? They are pretty easy to get used to and provide a ton of benefits when developing complex game systems.

For more details on these various topics take a look at the links below:

Unreal Engine C++ Fundamentals – Structs

By Development, Tutorial, Unreal 5 Comments

Today we are going to take a little break from our player character series and go over a few Unreal Engine C++ Fundamentals. This is going to be a new side series of videos / helpful material that should give you insight into various common Unreal data types, functions, macros, etc etc.

We may even dive into some more basic concepts just around c++ and object oriented programming like loops, conditionals and inheritance.

Lots of stuff for us to play with but let’s kick this off with Structs !

What is a struct ?

A struct is a data structure made up of other data structures …. yes this all makes sense now ….

If you look closely enough though, you have seen them and most likely worked with them already, perhaps in the form of a FVector aka struct FVectoror a FRotator aka struct FRotator.

So why do I care about structs when I have classes ?

Structs allow you to have containers for your object definition without having necessarily carrying the burden of new class definitions and instantiations.

A  class tends to contain a lot more logic, it may carry more data around in it self, it may be used for complex inheritance and it has it’s on constructor / destructor life cycle.

A  struct ends up being much smaller in definition, it tends to carry less data around, it performs less logic and tends not to have various accessors that classes do.

Structs also end up being member variables of a class in order to organize and group certain sets of properties together.

Outside of those small differences they are pretty much the same.

Both allow for member variables, both allow for classes or structs to be nested as member variables and they also allow inheritance.

What about UCLASSand USTRUCTsince you know … Unreal C++ !?

UCLASSand  USTRUCTare pretty much identical too !

UCLASShave their own initialization life cycle and come with constructors and destructors handled by the garbage collection in Unreal. They also allow for variable definition, method signatures, etc etc.

USTRUCT is pretty much a C++ struct but it comes with member reflection. So you can do things like break the FRotator in your Blueprint. Where as this process is a bit more involved with a UCLASS because of how access to member variables is setup.

POINT OF NOTE:

USTRUCTsare not handled by garbage collection so it’s up to the developer to make sure that USTRUCTsbelong to objects, like UObject for example, that will be picked up and destroyed by Unreals garbage collection.

Well if they are so great how do we use them ?

In the realm of C++ a struct is really the same thing as a class, except for a few syntactical differences.

For example structs in C++ default their member variables to public by default while classes have private variables by default.

C++ Struct

struct Character {
    int speed; // speed is public
};

C++ Class

class Character {
    int speed; // speed is private
};

Now how about doing the same in Unreal ?

Below is a basic definition of a UCLASSwhere we define the member variable of Running.

// Header
UCLASS()
class YOURMODULE_API APlayerCharacter: public ACharacter
{
  GENERATED_BODY()

public:
  UFUNCTION(BlueprintCallable, Category="Player")
  bool IsRunning();

private:
        bool Running = false;
};


// Source
bool APlayerCharacter::IsRunning()
{
    return Running;
}

Now let’s build a USTRUCTthat also implements the Running variable.

Since USTRUCTsdon’t require their own class file definitions we can simply put our struct into any accessible header file. Ideally you put structs in their contextually appropriate classes or in meaningful header files ( example: GameStructs.h ).

So let’s re-write the example above using a USTRUCT.

// Header

//Use USTRUCT(BlueprintType) if you would like to include your Struct in Blueprints
USTRUCT()
struct FPlayerStats
{
  GENERATED_BODY()

  // Use UPROPERTY() to decorate member variables as they allow for easier integration with network replication as well as potential garbage collection processing
  UPROPERTY()
  bool Running;	

  FPlayerStats
  {
     Running = false;
  }
};


UCLASS()
class YOURMODULE_API APlayerCharacter: public ACharacter
{
  GENERATED_BODY()

public:
  UFUNCTION(BlueprintCallable, Category="Player")
  bool IsRunning();

private:
  // member variable of FPlayerStats
  FPlayerStats PlayerStats;
};


// Source
bool APlayerCharacter::IsRunning()
{
    return PlayerStats.Running;
}

As you can see it’s pretty easy to convert properties or parts of properties into Structs.

Here are a few helpful links if you want to do more reading about Structs

Unreal C++ Tutorial – Player Character Series – Punch – Part 5 – Playing Sounds

By Development, Tutorial, Unreal No Comments

Hey guys,

Today we are going start expanding our project by adding in and playing our punch sound.

The topics we are going to cover in the tutorial are:

  • USoundCue – 01:30 – we are going to attach our WAV file to a sound cue and bring that into our code.
  • UAudioComponent – 08:10 – we are then going to tie our sound cue to our audio component to be able to handle playback.
  • Playing sounds – 12:50 – we are going trigger the playing of the sound and adjusting it’s pitch to introduce a bit of variance.

As usual we have our started GitHub project as well as the final version with our sounds implemented.

Additionally here are a few links to do some further reading on the items we discussed:

Thanks for taking a look and we’ll see you next time.