Hey guys,
Today we are going to continue exploring Unreal Engine C++ Fundamentals before we get back to our Player Character series by taking a look at Anim Notify and Anim Notify States.
You can find the GitHub project for this video in the usual location.
What is a Anim Notify ?
An Anim Notification or a UAnimNotifyis a way of assigning events to parts of our animation that will be triggered at specific times of the animation playback.
UAnimNotifiesreally only have one notification event. It either fires or it doesn’t.
Why do I care ?
Well most games have various animations and each animation may trigger different effects depending on it’s life cycle.
For example if we want to play back a noise that a weapon makes as our character slices it through the air we may want to use an UAnimNotifyto trigger this event and then we can tie that event to the playback of our wooooshing sound.
We can also use notification events to trigger special effects, events in the game, UI updates, whatever you can imagine you can tie into this execution.
Ok smart guy what about Anim Notify States ?
Anim Notify States or UAnimNotifyStateare almost identical to our Anim Notifies except for one difference and that is that Anim Notify States come with three events:
- NotifyBegin
- This even is fired once when the notification is first triggered.
- NotifyTick
- This event fires continuously every tick, during the execution of an
UAnimNotifyState.
- This event fires continuously every tick, during the execution of an
- NotifyEnd
- This even fires once at the end of the
UAnimNotifyStateexecution.
- This even fires once at the end of the
Alright so we have these magical events, how do we code them ?
First let’s take a look at a UAnimNotify
// HEADER

UCLASS()
class UE4FUNDAMENTALS03_API UPunchThrowAnimNotify : public UAnimNotify
{
  GENERATED_BODY()

public:
  virtual void Notify(USkeletalMeshComponent* MeshComp, UAnimSequenceBase* Animation) override;

};


// SOURCE CPP

void UPunchThrowAnimNotify::Notify(USkeletalMeshComponent* MeshComp, UAnimSequenceBase* Animation)
{
    // print method name to screen
    GEngine->AddOnScreenDebugMessage(-1, 4.5f, FColor::Purple, __FUNCTION__);
}
So, as you can see, by inheriting from UAnimNotifywe are able to overwrite the “Notify” method and then print some stuff to the screen.
Pretty easy.
Now let’s see what a UAnimNotifyStatelooks like
// HEADER H

UCLASS()
class UE4FUNDAMENTALS03_API UPunchThrowAnimNotifyState : public UAnimNotifyState
{
  GENERATED_BODY()

public:
  virtual void NotifyBegin(USkeletalMeshComponent* MeshComp, UAnimSequenceBase* Animation, float TotalDuration) override;
  virtual void NotifyTick(USkeletalMeshComponent* MeshComp, UAnimSequenceBase* Animation, float FrameDeltaTime) override;
  virtual void NotifyEnd(USkeletalMeshComponent* MeshComp, UAnimSequenceBase* Animation) override;

};


// SOURCE CPP

void UPunchThrowAnimNotifyState::NotifyBegin(USkeletalMeshComponent* MeshComp, UAnimSequenceBase* Animation, float TotalDuration)
{
    GEngine->AddOnScreenDebugMessage(-1, 4.5f, FColor::Yellow, __FUNCTION__);
}

void UPunchThrowAnimNotifyState::NotifyTick(USkeletalMeshComponent* MeshComp, UAnimSequenceBase* Animation, float FrameDeltaTime)
{
    GEngine->AddOnScreenDebugMessage(-1, 4.5f, FColor::Yellow, __FUNCTION__);
}

void UPunchThrowAnimNotifyState::NotifyEnd(USkeletalMeshComponent* MeshComp, UAnimSequenceBase* Animation)
{
    GEngine->AddOnScreenDebugMessage(-1, 4.5f, FColor::Yellow, __FUNCTION__);
}
Cool ! Now show me how to tie those events into my game.
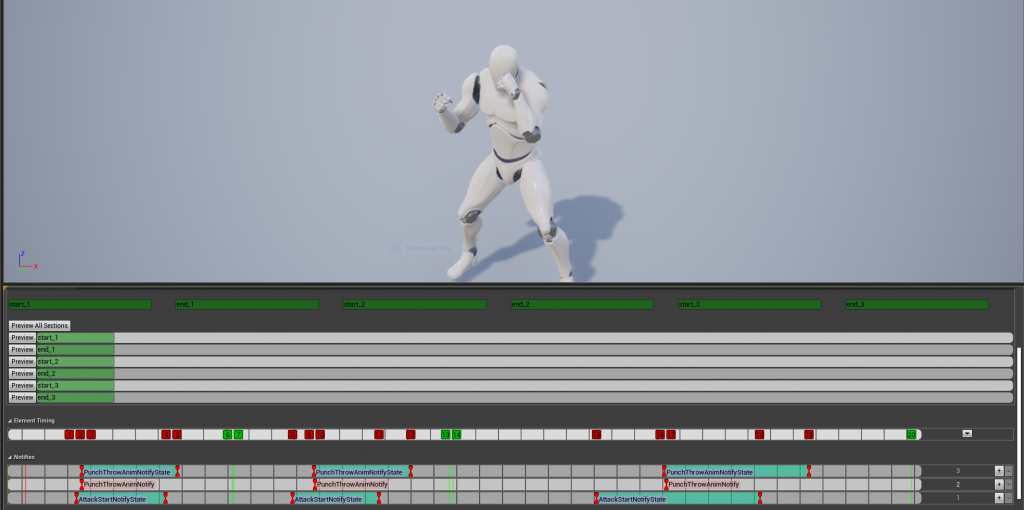
Well the majority of that is covered in the video but if you are curious this is what the events look like when you add them to the animations.

The way we added these notifications was by going to the bottom part of the animation montage labeled “Notifications”.
Then by Right Clicking we were able to pick our notifications.
This was all done from the Melee animation montage.
POINT OF NOTE:
UAnimNotifyand UAnimNotifyStatescan be added to single animations as well as animation montages. Which gives you a lot of freedom as to where and how you want these events to be triggered.
So there we go guys, with just a few lines of code and a bit of clicking we have notifications coming out of our animations and into our game.
If you would like to learn a little bit more about these various topics, check out the following links:
